Search This Blog

Wednesday, 21 October 2015

Ponfa pram restoration - part 4

See Ponfa Pram restoration - Part 1, Ponfa pram restoration - Part 2, Ponfa pram restoration - Part 3.

The next stage of the Ponfa pram restoration job was perfectly timed for late summer when we had some dry days which were not too breezy.  The respraying of the pram had to take place out of doors.

I used silicone carbide paper to carefully sand down the body work and a metal file to remove a couple of paint bubbles from the wheels and spokes to prepare for painting.  I also applied Kurust to the spots on the body where the paint had been scratched away, I couldn't see any rust but just wanted to be sure.  The Kurust only turns black on contact with rust, otherwise it remains orange brown.  The chassis received the same treatment and proved to have very little rust.

The brown marks are where I painted Kurust on the spots on the pram body just in case there was any rust where the paint had scratched off
I bought Plastikote satin finish radiator paint in spray cans. I did not want the pram body to be shiny and was doing respraying of another doll related project at the same time so the paint (2 cans of it in the end) served both projects well.  I set up a large cardboard box on a table on the back patio in a sheltered corner and propped the pram parts in the box.  The rubber tyres on the wheels was carefully covered with strips of masking tape to prevent them getting painted.

I masked off the Ponfa pram label as I did not want it covered in paint.  The respraying of the pram body, chassis and wheel hubs was done in many short batches of spraying to provide an even coat with no bubbles or runs.  I also sanded down between some layers of paint with a piece of silicone carbide paper to smooth the surface.  The parts for repainting would be propped in different positions for each stage so that each surface received paint.  The paint was quick drying so I was usually able to add another layer every 15 minutes or so, with light sanding approximately every 4 layers.
The pram body in the respraying box during one of the final stages of respraying
The wheels after respraying, I was just starting to remove the masking tape when I decided to get the camera
The resprayed wheels before removing the masking tape from the tyres
I lost count of the number of spray layers which were needed to paint the pram body, chassis and wheels or the number of times I gently sanded the surface smooth, however eventually I was satisfied with the finish and was able to remove the masking tape.

The pram handle needed some attention before being put back on the resprayed body.  We discovered that the inside of the bolt holes had sharp edges which needed to be filed smooth and flat and also the handle needed very slight reshaping.

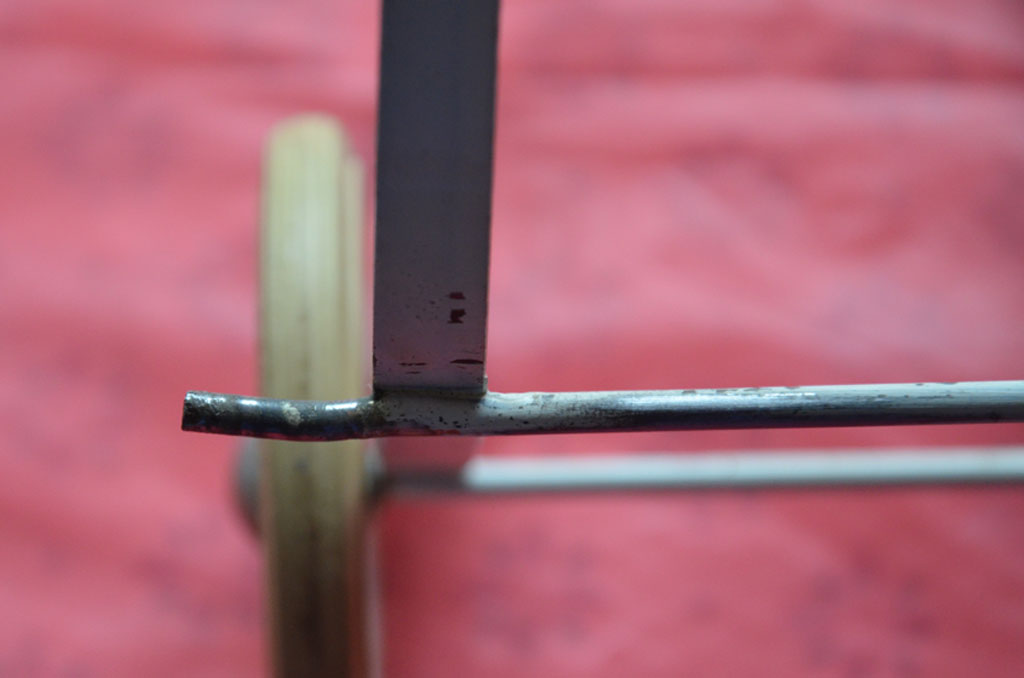
The pram handle showing that where the bolt holes are the handle splayed outwards, it also sprung tightly against the body of the pram and needed slight reshaping so it wouldn't scratch the paintwork when it was refitted.
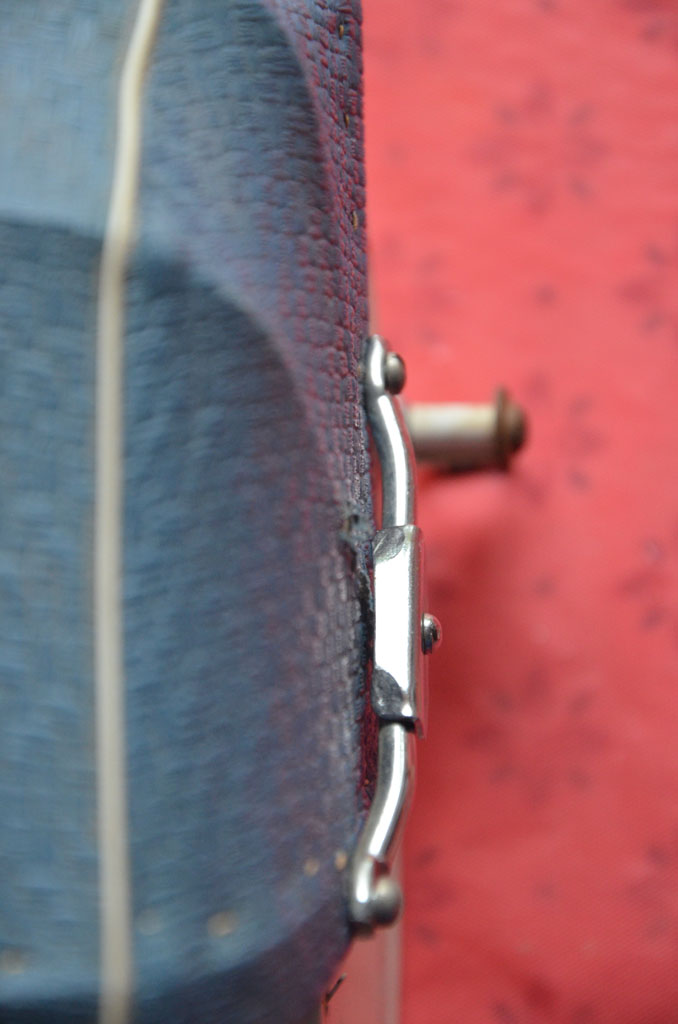
A closer photo of one side of the pram handle bolt fittings
A close up of the beautifully shaped bolt hole positions before the rough edges were filed smooth
A view from above the bolt holes showing the slightly protruding sharp edges
My husband did the filing and reshaping and I bolted it back onto the pram.

For the other parts in this restoration process see
Ponfa pram restoration - Part 1
Ponfa pram restoration - Part 2
Ponfa pram restoration - Part 3
Ponfa pram restoration - Part 5

The contents of this blog post has been created and shared using a Creative Commons ShareAlike Non-commercial licence which means others can remix, tweak and build upon this work non-commercially as long as they credit me and licence their new creations under the identical terms.  If you reuse any part of this blog post including photos or text please use the following attribution to credit me:  CC BY-NC-SA by DollMum http://dollmum.blogspot.co.uk/2015/10/ponfa-pram-restoration-part-4.html
For more information about Creative Commons licences see https://creativecommons.org/

Monday, 19 October 2015

Ponfa pram restoration - part 3

See Ponfa Pram restoration - Part 1 and Ponfa pram restoration - Part 2.

I took the Ponfa pram parts in a box to Dawn L's Midsummer Sasha celebration in June, Rosie S had brought her pram, which also needed some restoration, for us to compare.  Rosie's pram is a Doucet of the different body shape (there are Doucet and Red prams with the identical body shape and chassis to my Ponfa pram) and it was interesting to compare them.  Her pram hood was in much better condition than mine but the body was in need of restoration.  Theresa had also brought her restored Red pram (same body shape as my Ponfa) and of course we had Dawn's wonderful collection to admire (she has at least 15 miniature prams one of which she was in the middle of restoring).

After this for a while pram restoration had to stop as we had family events and the garden to concentrate on so it wasn't until later in August that I was able to devote any useful time to the pram again.

I took the plunge and removed the hood fabric from the frame.  I had noticed that the frame was a bit rusty and when I was still debating whether to replace the fabric or not, the rust at the joint made the choice easier - I did not want it to get worse and I knew how to treat it.  I am glad I made this decision as removing the fabric proved that it was beyond repair because of extensive rust staining on the inside of the fabric.  This would have been impossible to clean off satisfactorily.  I will keep the original hood fabric as it belongs to the pram.

I photographed the fabric removal in stages for reference during the remaking of the hood.  The lining, edging strip around the inside top of the hood and outer fabric were stitched onto the frame using a thread which went through all three layers, in other words all three pieces were stitched on at once.

removing the stitches to remove the lining and hood fabric from the frame
The hood frame wires were stitched to the inside of the hood at seam points, to keep them in place
The lining and edging tape (badly stained) partly unstitched
The lining and edging tape completely removed showing the rust staining on the inside of the hood fabric
Close up of the rusted frame and stained hood fabric
The hood frame without its fabric, showing how the hood wires were squashed to one side, the top front curve of the frame was also a bit distorted.
Side view of the hood frame and the rust on the main framework
Before reshaping the frame I sanded it down with the fine grade silicone carbide paper to remove any loose rust.  The surface was not heavily pitted so I could tell that the rust period was only from one short time in the history of this pram, which was a relief.  A heavily pitted surface would have resulted in the frame being much less robust and possibly unable to withstand reshaping.

To correct the frame distortion I made a cardboard template of the correct shape of the curve so that the two sides of the curved frame section would match. One side was more or less okay, so I traced this onto card and cut it out.  This gave my husband the curve to work to when reshaping the frame.
Making the template for the hood frame curve
The cardboard template sitting in the curve
The neatly re-curved hood frame with the wires reshaped too
The hood wires reshaped
Side view of the reshaped hood frame
Once all the hood frame parts were reshaped (he used pliers, a bench vice and bare hands) I painted Kurust onto the main frame where the rust had been. This special rust treatment turns the old rust patches black and prevents any further rusting, as it provides a fine protective coat on the metal.  It had to dry then be rubbed over with paper towel to ensure there was no residue remaining which might have stained any future fabric.  I then painted the joint areas with silver paint where the two sections of the frame are joined together with nuts and bolts, as these would be the only areas of the frame which would show once the fabric was stitched in place.

The reshaped frame after the Kurust was applied
Kurust made the previously rusted parts of the frame go black
The frame was bolted back together ready for the new fabric.

For the other parts in this restoration process see
Ponfa pram restoration - Part 1
Ponfa pram restoration - Part 2
Ponfa pram restoration - Part 4
Ponfa pram restoration - Part 5

The contents of this blog post has been created and shared using a Creative Commons ShareAlike Non-commercial licence which means others can remix, tweak and build upon this work non-commercially as long as they credit me and licence their new creations under the identical terms.  If you reuse any part of this blog post including photos or text please use the following attribution to credit me:  CC BY-NC-SA by DollMum http://dollmum.blogspot.co.uk/2015/10/ponfa-pram-restoration-part-3.html
For more information about Creative Commons licences see https://creativecommons.org/

Sunday, 18 October 2015

Ponfa pram restoration - part 2

See Part 1 of the Ponfa pram restoration for the beginning of the story.

The little Ponfa pram restoration started soon after we had taken it out of its travelling box from the USA.

It had a wobbly wheel which we discovered when dismantling the pram, this was due to the wheel shaft being bent.  In the following photo you can see which wheel is wobbly (top left) - it leaned in on one side to the chassis and also seemed much more unstable on the shaft than the others.

the chassis and wheels before restoration
As I explained in the previous post, the chassis needed re-bending to shape in several directions - the arms of the chassis were too close together which meant they weren't providing enough tension for the leather straps which held the body in place providing the suspension, so the body was sagging at one end.  In addition, each of the chassis arms was bent to one side or the other which meant that the body was catching slightly on some, resulting in the characteristic curved scratches on the sides of the body which I've seen on several miniature prams, this is caused by the metal loop which hooks the leather strap to the chassis hooks.
The alignment of the chassis needed correcting
The other side of the chassis wasn't quite so out of alignment but still needed some straightening
This diagram explains about the distance between the chassis hooks and providing the right suspension for the pram body. If the chassis hooks are too close together then the leather straps will not support the body properly resulting in a body that tips at one end
The wheels are amazing - they have real spokes which when bent do actually make a difference to the shape and tracking of the wheel, they have real rubber tyres.  I was fortunate, the tyres on my pram, though having some tiny splits in places, were actually in very good condition and did not need replacing (it is a job which costs a lot as they have to be custom made).  The wheels are fitted on wheel shafts with miniature hub caps keeping them in place.

a side view of the chassis with wheels still on - these are fitted in place with hub caps
The hub cap for one of the wheels, showing the inside of the cap which push fits onto the shaft.  Due to the type of metal of the caps, these should not be removed and refitted too often or they will split.
The wobbly wheel with the hub cap removed
The bent wheel shaft needed some careful attention with pliers and a bench vice to get it straight. 

The bent wheel shaft which was causing the wobbly wheel
The wobbly wheel, hub cap and washer which gave some spacing between the wheel and the chassis
The wobbly wheel and chassis
My husband reshaped the chassis carefully so that the pram body hung properly on its four straps and did not scrape the sides anymore.  I cleaned up the chassis paintwork with gentle filing on a couple of paint bubbles and silicone carbide sandpaper.

The hood distortion had resulted in the hood fabric being slightly ripped by one of the chromed steel side brackets, which had rough edges on the inside.  So the debate started straight away about whether to attempt to restore the torn fabric (only the outside weave was torn, the inside weave was intact and the lining was in perfect condition). The apron was missing, the seller did not recall it having an apron and I knew that if I decided to make an apron it would be almost impossible to source fabric which matched the hood.  I attempted to glue the torn fabric back to its inner weave, but this was only partially successful so I started to hunt for fabrics online.   
Side view of the pram body with the hood up, showing the damage to the hood fabric caused by the inside of the hood bracket
Close up of the damaged hood fabric with the bracket still in place
The side bracket was actually too flat as well as having a rough joint on the inside, on the other side of the pram the side bracket had a more pronounced 'curve' to it which made it impossible to damage the fabric as the bracket joint was held away from the fabric, especially as the hood wires were slightly squashed to one side which was aggravating the problem on the damaged side.  However my husband took off both brackets to compare them, filed the sharp joints on the inside to smooth them, then carefully reshaped the flattened bracket to make it a bit more curved.  It was very hard to bend and he was afraid of breaking it, so I suspect it was probably slightly the wrong shape from the time it was made, however he did succeed in improving its shape a bit.
The damaged hood from above, showing how the distance between the fabric and the bracket was causing the damage
The other side view of the pram body with hood up and undamaged fabric
View of the side hood bracket which was the correct curved shape
The leather straps were fitted to the pram body by means of two metal rods which were mounted in holes in the bottom of the sides of the body and run underneath the floor.  Like the wheels they also have neat hub caps.  To prevent the leather straps from rubbing the side of the body are what I called hub caps with holes.

The underside of the pram body showing the shafts holding the leather straps
My husband soon had this section of the pram disassembled.  The leather straps needed cleaning as they were a little grubby and the metal parts all needed cleaning off as some were a bit rusty.  I used very fine grade silicone carbide paper for cleaning up the metal parts and a small amount of mild washing up liquid on paper towel to clean the leather.
A shaft rod, hub caps, washers and leather straps with their metal loops
The pram handle is chromed steel rod with neat shaping and special shaped mounting places for the nuts and bolts.
Unscrewing the pram handle - these were held in place with 4 nuts and bolts
Removing the pram handle
The hood is fitted to the body by four nuts and bolts.  These proved very difficult to unscrew, they could not be undone by hand so a screwdriver and bent nosed pliers were used to loosen the nuts from the bolts.
Unscrewing a nut from a bolt holding the hood in place. 
Removing the hood from the body, this photo shows the four holes for the bolts which  support the hood
My husband set to work on adjusting the wonky wheel  - it was slightly misshapen and the hole through which the wheel shaft goes also needed cleaning and gently filing.  It will always be slightly looser than the other wheels however it is much improved.
Adjusting the wheel spokes on the wobbly wheel
Once the hood and handle was off the body I was able to closely inspect the body of the pram.  The scratches to the paintwork were the only real damage - the rust on the body was minimal which was a huge relief (but was what I had expected from the photos which MDM had sent to me).  Fine sanding with silicone carbide paper was all that was needed to the body ahead of painting.

For the other parts in this restoration process see
Ponfa pram restoration - Part 1
Ponfa pram restoration - Part 3
Ponfa pram restoration - Part 4
Ponfa pram restoration - Part 5

The contents of this blog post has been created and shared using a Creative Commons ShareAlike Non-commercial licence which means others can remix, tweak and build upon this work non-commercially as long as they credit me and licence their new creations under the identical terms.  If you reuse any part of this blog post including photos or text please use the following attribution to credit me:  CC BY-NC-SA by DollMum http://dollmum.blogspot.co.uk/2015/10/ponfa-pram-restoration-part-2.html
For more information about Creative Commons licences see https://creativecommons.org/

Saturday, 17 October 2015

Ponfa pram restoration - part 1

Many Sasha collectors know of the beautiful prams which were made in France as playthings (not salesmen's samples as some believe) in the 1950s.  Dawn L has a wonderful collection of them which I've blogged about before and this year in the Sasha Festival Journal (which my daughter received ahead of the festival from Rosie S because she wrote an photo story for it) Dawn had written a fascinating article about the prams (Doucet, Red, Ponfa and the mysterious Yellow).  Personally I think they were all made by the same company with different names applied over a period of years as some Doucet prams are identical in body shape to the Red and Ponfa prams, while other Doucet prams have a different body shape and chassis construction.

I have long wanted one of these prams to restore but even prams needing major attention tend to command a very high price and they only appear occasionally on ebay, RubyLane or other antique sites. So I've seen several go well beyond my reach.  In May this year I was lucky as I spotted a lovely little Ponfa pram on RubyLane which needed some restoration but wasn't in terrible condition and was within my price range.  It was described as follows:

Vintage French Doll Carriage, Pram, Buggy-Ponfa, Made In France
Showcased here for your consideration is this vintage French Ponfa miniature toy doll carriage in good condition! It still retains the manufacturer's sticker on the bottom that reads "Ponfa Made In France." I believe these diminutive prams were made in the late 1940's to early 1950's. This wonderful little accessory is the perfect foil to display your vintage and antique baby dolls. It measures about 9" tall by 11" long and 6-1/2" wide. It is intricately made with moving parts and is very realistic in its presentation--almost like a salesman's sample. The blue vinyl hood can collapse down or stand up to shade Baby. It is constructed with chrome and metal parts. Little bonded leather straps hold the carriage assembly to the frame, acting as shock absorbers. The whole thing sits on old rubber wheels that turn. Inside the buggy is are a pillow and mattress which are not original to the piece, but will be included. The chassis is in very good condition, but there are some scratches & wear to the painted metal surfaces. The hood and the tires are excellent. Though not from the same era, there is a newer vinyl "nursing" doll included, since she has been on display with the carriage ever since my Mom acquired the carriage many years ago.

MDM's photo on Ruby Lane of the Ponfa pram
I contacted the seller (MDM) and asked for additional photos which she very kindly provided.  It didn't take me long to decide that this was the pram I wanted to restore.  I could see what needed to be done to correct the 'lurch' of the body in the chassis and I could tell it was in very good condition for its age.

MDM's photo on Ruby Lane of the Ponfa pram with hood down
MDM's photo of the chassis, showing how the curved strap holders are bent sideways, hence the scratches to the bodywork
MDM's side view of the chassis, showing how the chassis arms are too close together at the top, resulting in a lack of tension between the body straps
MDM's end view of the chassis, showing the twist of chassis arms
MDM's photo of the pram body with the hood up, showing hood framework distortion
MDM's photo of inside the pram body, showing how rust free it was - the minor rust marks from scratches in paintwork did not go through to the inside
MDM's side view of the pram body
MDM's side view of the pram body 
MDM's hood view of the body showing the small distortion of the hood framework
It was shipped from the USA at the end of May and arrived (once UK customs had charged me for importing it) very well packaged along with the baby doll which apparently had been displayed with it for several years by the seller's late mother.  Both the seller and her mum were avid doll collectors of good reputation.

My family were charmed by the pram when I removed it from the box and extensive bubble wrap.  We soon had it reassembled to see how it looked and began to study its various problems to work out exactly what order to do all the stages of the restoration.

I had done some internet searches to try and find other pram restorations and discovered there was not very much published openly, most restorers don't document the whole process and explain techniques online, especially if they are doing it commercially.  As I had explained to the seller, both of us have restoration skills (metal and woodwork) from another line of work, many tools and the workshop.  Dismantling and restoring the pram became a two person job simply because my husband couldn't keep away from it - his engineering mind flipped into gear as soon as we started discussing what needed to be done.  It would have taken me much longer without his help.  I had piqued his interest in this little project and although there have been many times in the past few months when it has had to be put to one side because of daily life, home DIY jobs, family celebrations, visitors staying overnight, my full-time work and voluntary project we have succeeded together in giving it a new lease of life. I have taken photos of most of the stages of work and will publish them in a series of posts in the coming days.

For the other parts in this restoration process see
Ponfa pram restoration - Part 2
Ponfa pram restoration - Part 3
Ponfa pram restoration - Part 4
Ponfa pram restoration - Part 5

The contents of this blog post (except the photos which are all rights reserved to the original photographer MDM) has been created and shared using a Creative Commons ShareAlike Non-commercial licence which means others can remix, tweak and build upon this work non-commercially as long as they credit me and licence their new creations under the identical terms.  If you reuse any text of this blog post please use the following attribution to credit me:  CC BY-NC-SA by DollMum http://dollmum.blogspot.co.uk/2015/10/ponfa-pram-restoration-part-1.html.
If you wish to use any of the photos please contact me at dollmum at yahoo dot co dot uk
For more information about Creative Commons licences see https://creativecommons.org/