Search This Blog

Wednesday, 23 May 2018

Sasha Celebration Weekend 2018 - Part 1

At last it was time to meet up with many Sasha friends again - I collected my younger daughter from school and we drove straight away to Nottingham, collecting Gillian from the station on the way.  We arrived at 5.45 pm and were soon unloading our Sasha dolls into our room.

First we found Janet and Tricia so we could set up our Fanfare band at the end of the Red Carpet Display, Mary joined us as we placed her beautiful flute player into the scene and together we admired the amazing outfits and dolls (included hair styles) on the other Red Carpet dolls and made plans for the live Fanfare band to rehearse the next day.

Louis Armstrong, Animal and Janet the flautist in the Fanfare Band
We had missed the £1 bazaar before dinner because it was held when we arrived, however we were soon meeting and chatting with other friends as we gathered for dinner.  Mary played her flute at intervals during dinner much to everyone's delight, we've never had live music before at the SCW.

Mary playing flute for our entertainment at dinner
After dinner Jocelyn gave a fascinating illustrated talk all about Frido and Trendon Sasha eyes and how they changed over time.

Friday evening dinner at the SCW

Tricia introduces Jocelyn for her talk about Frido/Trendon eye styles
On Saturday morning we met up with more Sasha friends at breakfast before setting up our craft table.
Louisa and baby Amy at breakfast

Gillian's childhood babies at breakfast
Our table was right beside the Red Carpet display, alongside our Fanfare band, I was relieved to see that Reuben had not dropped his trumpet during the night and Edmund was looking as wild as ever alongside the cool elegance of Janet, Mary's flute player.

This year all the craft kits were given to Janet and Tricia to sort into the gift bags so all we needed on our craft tables were the display materials and any tools/accessories needed to complete the craft kit, so it didn't take long to set up.

Abacus craft table before everyone arrived

Baby Nina holding her Abacus alongside the big abacus
Alan set up his time lapse camera on a stand alongside our table to take photos for 45 minutes (900 pictures apparently) which were later compressed into 30 seconds of film showing the progress of the crafters (I cannot share the video as it is unlisted).  The other two tables in our room were Jenny teaching smocking and Laura with her embroidered denim bag, in the other room Mary was demonstrating how to make fishtail plaits/braids, Judith was running a ballerina outfit (tutu) making workshop (she had provided the leotards ready made for the tutu) and Janet was teaching how to make an origami doll in decorated papers.

Fishtail plait/braid table

Ballerina outfit table

Embroidered denim bag table

Smocking table
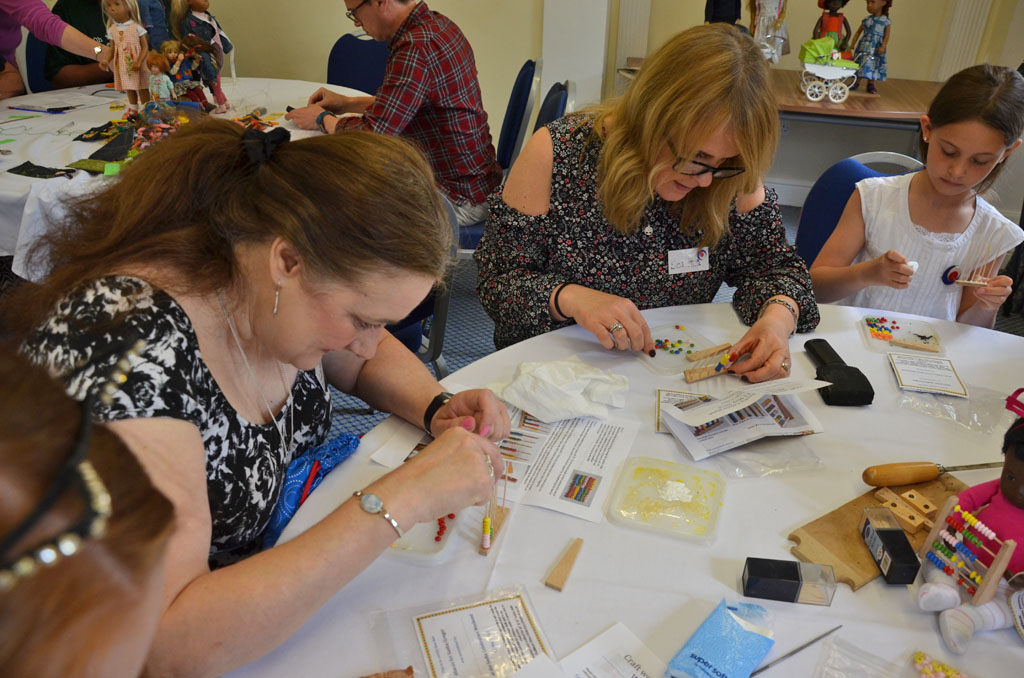
The crafters were busy all morning and people seemed to enjoy making the little abacus.  I was personally delighted that it was possible for a person who is partially sighted to make the abacus and I adapted the table height for one person who could not sit down due to a back injury (I put my large plastic box on the table to bring the height up to a better level for her).  The younger girls were also able to manage the abacus without difficulty too.  Everyone who did the abacus did their own patterns for the beads, which was fun to observe, one child insisted on doing her abacus to the power of 8 not 10 (she didn't want 10 beads in a row).

Abacus table crafters 1

Abacus table crafters 2

Abacus table crafters 3

Abacus table crafters 4

Abacus table crafters 5

Abacus table crafters 6

Abacus table crafters 7

Ballerina tutu table crafters 1

Ballerina tutu table crafters 2

Origami doll crafters table 1

Origami doll crafters table 2

Abacus table crafters 8

Abacus table crafters 9

Abacus table crafters 10

Abacus table crafters 11

Abacus table crafters 12

Abacus table crafters 13

Abacus table crafters 14

Smocking table crafters 1

Embroidered denim bag crafters 1

Abacus table crafters 15

Abacus table crafters 16

Abacus table crafters 17

My daughter's origami doll

With her origami doll

Abacus table crafters 18

Abacus table crafters 19

Abacus table crafters 20

Abacus table crafters 21

Smocking table crafters 2

Embroidered denim bag crafters 2
We stopped for lunch at 1pm and tidied up (this didn't take long).  Then it was time for the Grand Raffle draw - which I shall write about in Part 2.


Saturday, 12 May 2018

Sasha Celebration Weekend 2018 - what a Muppet

The theme for this year's main competition display at the Sasha Celebration Weekend was 'on the red carpet', in other words dress up as if attending the Oscars to hopefully receive an award.  There were the usual Oscar categories for entries, however we dreamed up something a little different - after all, those famous characters arriving in their best bib and tucker needed a fanfare to serenade their important arrivals! So I asked Janet if we could provide a small fanfare band rather than stick to the categories and she was very happy to allow this idea, especially as our Sasha dolls have musical instruments.

I wanted to provide a trumpeter in his best tailcoat.  Mary R decided to join us with her beautiful NP doll playing the flute and wearing a gorgeous elegant dress.  So far so proper and upright for a dignified fanfare.  However you cannot have a fanfare without some drums and it didn't take a giant leap of imagination for my younger daughter and I to brainstorm the outrage of a toddler getting in on the act and subverting the whole piece by being the drummer - in character of course - none other than Animal from The Muppets!

How to make Edmund look like Animal was the next challenge.  We looked at plenty of photos and some hilarious videos (Animal duelling with other famous drummers who had come on as guests of The Muppets).  My younger daughter had just learned how to crochet and I suggested she return to Lorraine's hat pattern from the first SCW (she had not got very far with it during that craft workshop).  She constructed a crochet helmet for Edmund including a chin strap in both the base red colour as well as a strip of black crochet for inside his lower lip. She also crocheted a ridge of black to form a base for his eyebrows.

Edmund wearing the basic crochet helmet with his proud owner who was just fastening off the chin strap
Then she sewed on a large round red wooden bead for his nose (just above his little face peeping through the mouth opening) and glued on some white felt circles into which she had glued some wobbly plastic eyes. She made a row of white teeth of felt and glued that onto the black row of his lower lip. Suddenly the red helmet started to look something like the character she was creating.

Sewing on the nose

Making sure the nose was securely stitched onto the helmet

Finishing the nose sewing

Nose in place and the chin strap with the black band for inside the mouth

Eyes, eyebrows and teeth in place, adding the first of the shaggy hair
Next came the most time consuming part - lots of lengths of coloured wool was hooked into the helmet (rag rug style) all over his head.  This meant cutting hundreds of pieces of wool, folding them in half and using the crochet hook to loop them through the holes in his helmet (the texture of crochet provides natural holes, ideal for this purpose).  She used a few strands of carefully placed black wool to emphasize his wild eyebrows.  She used the same thick red wool as the helmet for some strands but thinner, 4 ply variegated colour wool for the bulk of his mad hair - the colour shades included coppery orange and deep reds.

Hard at work making Animal hairy

Looping through the next piece of wool as Animal starts to look like his wild self
She made his simple top and trousers and we had plenty of large link chain in the workshop to provide Animal's tether.  My elder daughter looked at lots of pictures of the Muppet drum sets, many of them said Dr Teeth (because it was the band name) but I wanted the drum to have 'The Muppets' on it, so she designed a good combination of the two. I printed this out on card (she had designed it on her ipad) and fitted it on the largest drum of the desktop drum kit.  I made a stand to turn this drum into a bass rather than a snare drum out of thick wire and used two flexible camera tripods fitted into lolly sticks to hold the two smaller drums in the right position and height for snare drums (on the original layout they clipped onto the rim of the biggest drum, mounted on a stand which was too high for Edmund).  I made a wire stand to attach to the existing cymbal stand (which normally also clipped onto the biggest drum).  I gave the wire stands feet of orange clay to stop them scratching any table top they were placed on.  I made a couple of drumsticks out of bamboo skewers and beads for Edmund / Animal to hold.
Late night finishing of the back of Animal's head
Next we decided that the band needed its own red carpet and bunting, so I cut longer posts than we had used for the Happy Birthday banner at the 2017 festival and fitted them into the existing banner stand.  My younger daughter made simple bunting out of red cotton sheeting with the letters written on the bunting with felt tip pen.  I made a carpet out of the same red sheeting and carpet covers for the 3 doll stands.

The remodelled desk top drum kit with The Muppets on the bass drum and clay feet on the metal stands

The Fanfare band bunting
I decided that Reuben was honouring a famous jazz trumpeter who was also a movie star in High Society - Louis Armstrong. I designed the tailcoat using adapted pattern pieces I had previously used for the school blazers I made for the Summer School swap Lorraine organised a few years ago. I sewed a simple sleeveless white shirt to go under the tailcoat to provide a white collar, and some black trousers. 

Reuben needed to hold the trumpet, this was my next challenge.  Sasha doll hands are curved but are not designed to hold a heavy metal trumpet at the right angle for a fanfare.  So I used some clay to fill in his hands and pushed the trumpet onto the damp clay to get the best position and shape when his hands were held up (fortunately his stringing is good).  The clay dried, was painted brown and one piece was glued to the trumpet.  The 2 clay pieces were fitted back into his hands using blutak (I did not want to glue them to his hands) and when setting up the display the second piece of clay was glued to the other side of the trumpet to hold the hands closer together than they would normally naturally be (blutak failed after a while in that position in my earlier experiments, so it was better to use evostick glue for trumpet to clay joins).

Reuben holds up his left hand to show the painted blob of clay

Reuben holding the trumpet with his right hand

The right hand clay piece glued on the trumpet, with blutak for sticking it to his hand

Louis Armstrong and Animal warming up for the big Fanfare
Please note, these photos were taken before the SCW at home.  I'll do another blog post after the weekend with photos of the red carpet display and the band including its classy flautist.

Sasha Celebration weekend 2018 - preparing the craft kit

Every year at the Sasha Celebration Weekend (SCW) in Nottingham I have given a craft workshop on the Saturday morning alongside several others teaching a craft of some kind.  Mine have always been wooden toys for Sasha and Gregor dolls - 2015 was a miniature train engine, 2016 was a marionette bird, 2017 was a push-along duck and this year a counting toy - a traditional abacus.

I had thought of making an abacus a couple of years ago, then my younger daughter suggested it specifically for the SCW in 2018.  As always the challenge is to design something which would be relatively straightforward for people to make and appealing without the planning and preparation of 50 kits driving me insane with lots of parts to prepare.  So although some toys would be wonderful (such as the little wooden horse I made as part of my donation to the Children's fund auction at the 2017 Sasha Festival in the USA), it would be tedious to mass produce all the parts when there are lots of elements and processes before the kits can be bagged up with instructions for assembly.

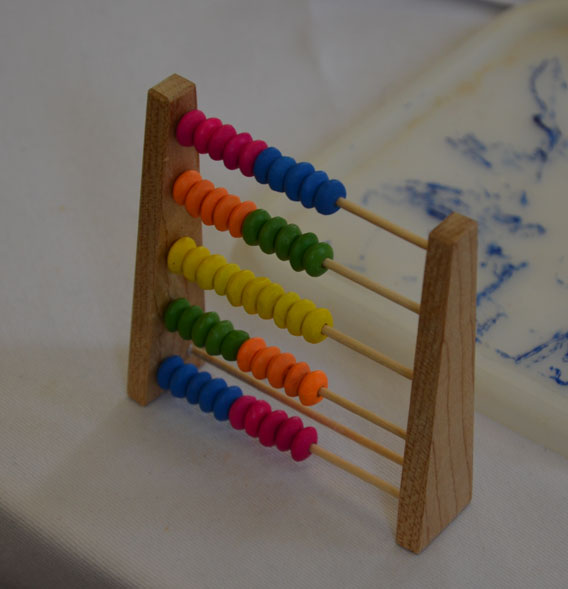
I used as inspiration the abacus my children played with when they were small - a simple wooden frame with coloured beads mounted on 10 thick wires.  On a very small scale my early sketches and experiments with beads proved that a 10 row abacus would be impractical - I found some 5 row examples in pictures online and they are very effective.  At first I considered using wires but then decided that cutting and filing the sharp edges for 250+ wires would be incredibly time consuming, so I decided to use cocktail sticks instead.  This immediately limited the size of the abacus to, as it turned out, pretty much the right scale for the dolls (because of the length of cocktail sticks, trimmed slightly to remove the sharp points). 

I needed beads which would fit 10 in a row on a cocktail stick yet allow movement for counting, so discovered in my measurements that round ball beads would not fit, they needed to be round flat beads (I had some from another craft project, but not nearly enough).  So I purchased packets of mixed coloured flat round wooden beads - I needed 2,500 but had to buy more because some beads had clogged holes or had been misshapen or broken in manufacture, and some colours (especially yellow) I needed more of than others.  The packets had 7 different colours, I used 5 colours in each kit, in different combinations.
The original abacus and the various combinations of bead colours for the miniature versions

Then came the tedious business of filing out the holes of 2,500 beads - many of the beads had partially clogged holes (burrs of wood filled with the paint) so didn't slide easily on the cocktail sticks.  Years ago, as a young apprentice, I had bought a set of metal needle files as part of my toolkit and the fine round needle file was put to good use as I gradually filed and sorted the beads into colours.  This was a good job to do while watching DVDs or TV with the family when sitting at my computer desk (I tend to multi-task), I did them in small batches as gripping the small beads (which have edges unlike perfectly round beads) and the needle file eventually hardened the skin on my fingers and thumbs.

Filing out the holes in the beads using a needle file

My husband was a star - he did the wood cutting for the side pieces for each abacus.  I had designed the sides to be tapered like the full size example, which meant that it wasn't just strips of rectangular wood, but an angle on each piece!  He had lots of old maple floor boards in his wood stock so cut up a piece into strips then cut the strips into the right lengths, then set up an angle piece jig on his saw to cut the strips at an angle into a pair for each abacus.  He makes me nervous as he doesn't use a saw guard (he hasn't cut off any fingers yet as he is extremely careful but that doesn't stop me being anxious about it).  I still have vivid memories of visiting my father's workplace as a child, going into the big shop-fitting workshop with lots of power tools and seeing some workmen who previously had saw accidents, damaging their hands.

Sawing the abacus side pieces - cutting the angle to make pairs
Once all the pairs of wood were ready, I set up a jig for drilling the holes in the right positions.  It would have been very time consuming to measure them out individually, so I drilled one piece with holes all the way through and this was used as a guide piece in a jig (2 pieces of wood screwed to a base at the correct angle to grip the abacus pieces).  I put the piece to be drilled into the jig with the drilled out piece above it, all lined up, then drilled through both, though with the drill set to the right height so that the holes did not go all the way through the abacus side.  The other abacus side piece was drilled as a mirror of the first side.  I like drilling holes, which is just as well because for each side piece there were 6 holes (5 for the bead rows and one for the support bar) which totalled 600 holes for the 50 kits (in practice it was more than 600 because the dog chewed a few of the pieces and my husband had to make more!).

Drilling holes in the abacus side pieces

Abacus side pieces waiting to be drilled

Drilling through the guide piece into an abacus side piece beneath the guide, wedged between the jig pieces

Drilled pieces in pairs

All the pieces were sanded to remove saw marks (he hadn't planed the wood smooth) and the cocktail sticks had their tips removed (I used a chisel on a woodblock) - six cocktail sticks were needed for each abacus (300). 
Trimming the cocktail sticks and the trimmed sticks laid out on a sheet of paper
Then all the beads, cocktail sticks and side pieces were sorted into bags, along with the printed instructions, which I prepared once I had made up the prototype abacus and photographed each stage of assembly.

Kit of parts to make the miniature abacus

A bead layout for 5 rows, mixing up the colours a bit

Gluing the trimmed cocktail sticks into the holes on one side piece

Cocktail sticks ready for threading the beads

Beads threaded onto the cocktail sticks

Blobs of glue on the end of the cocktail sticks, ready for the other side piece to be fitted

The second side piece is glued onto the cocktail sticks

Excess glue wiped off, the completed abacus

Allowing the glue to dry with the beads clear of the sides

As a Sasha friend (also making up kits for SCW) said to me when she guessed what I was making for the SCW craft kits: "as a friend I would like to inform you that you are BONKERS! but maybe you knew that already!"

Baby Nina plays with her new abacus while sitting in the chair from 2017 SCW