See also
Ponfa Pram restoration - Part 1,
Ponfa pram restoration - Part 2,
Ponfa pram restoration - Part 3 and
Ponfa pram restoration - Part 4.
With the chassis, wheels, body and hood frame restored, I could turn my attention to re-covering the hood. I had sourced some laminated cotton fabric from the USA via Etsy and also bought some Silver Cross pram fabric via eBay. I bought some water resistant fabric samples from boat suppliers and weighed up the pros and cons of each. I also corresponded and exchanged samples with Catherine F who had restored her Doucet pram last year and had it on display at the Chat 'n Snap 2014. She has another pram to restore.
The difficulty with choosing a waterproof fabric is to find something that is pliable and flexible enough to make the hood work but at the same time not crease irreversibly when the hood is pushed down. Finding the right balance was tricky because at the same time I wanted the fabric to be able to make neat seams which would retain their shape.
Before cutting any fabric I had to make a pattern from the old hood cover. I did this by measuring and drawing out the pattern on some paper then adjusting it when measuring it up to the existing hood. I did not want to take the old hood apart so this was a difficult job to get right because of the shaping involved and when I came to sew I had several bouts of unpicking and restitching before I was satisfied. The hood consists of 2 identical mirror image side panels and a long straight central panel. On looking at the side pattern pieces now after completing the job I can see where the pattern I made differed from the eventual hood.
 |
| The pattern pieces I drew for the pram hood |
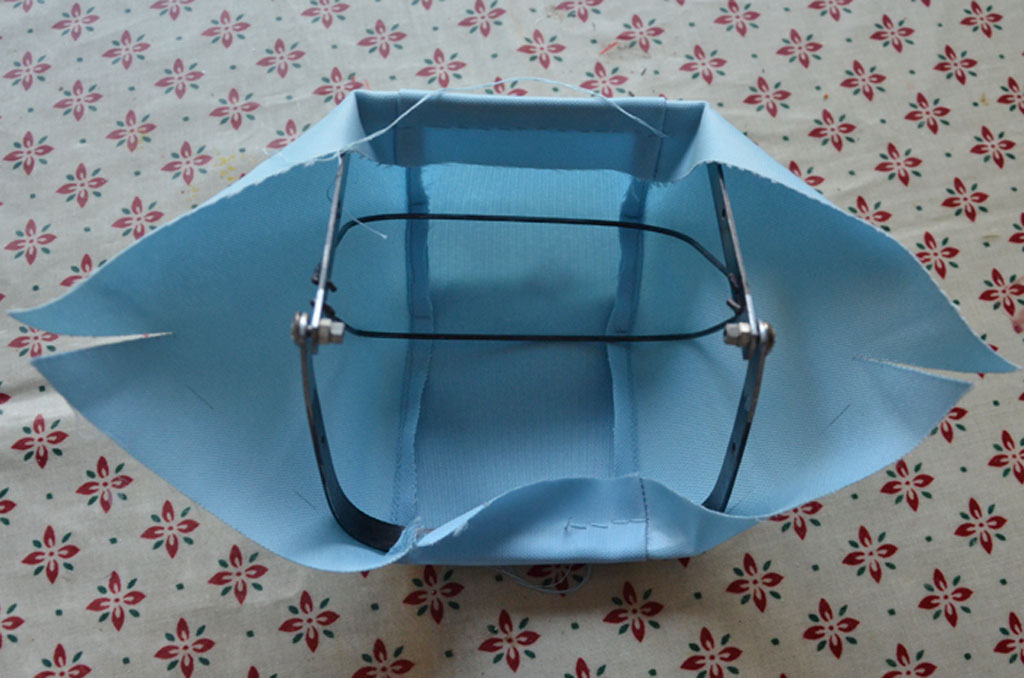
I decided to try the Silver Cross fabric even though it felt a bit thick and less pliable than the original fabric on the hood. The following photos show how far I got with the pale blue Silver Cross fabric before I decided that my instinct about its thickness was right. At this stage I also hadn't adjusted the pattern to make it taut across the frame (my seam allowances were too generous and I was sewing too close to the edge) and I hadn't used any piping in the seams. The fabric was refusing to make neat crisp seams on the outside because it wouldn't crease enough even when I took a risk and used a cool iron. It was just too large a scale of thickness for the size of the pram.
 |
| The partly sewn Silver Cross pram fabric on the Ponfa pram frame |
 |
| This photo shows the problems with the seams not creasing sufficiently well with the Silver Cross fabric, even when I pulled the fabric taut on the frame it just didn't look right. |
So the Silver Cross fabric was abandoned in favour of trying out the pieces of laminated cotton I had bought via Etsy. The lime green colour I chose might offend those who believe in only using traditional colours for vintage prams, however I couldn't resist it and could visualise what it would be like when I first spotted the fabric online. The laminated side is too shiny to use outwards on a pram however the unlaminated side of the plain fabric was perfect to have facing outwards with the laminated side eventually hidden by the lining, especially as this meant the fabric would be protected from any potential staining from Kurust on the metal frame (unlikely). However the unlaminated side has no protection from stains so I'll have to handle the pram with care (no dirty fingers allowed).
 |
| The 2 pieces of laminated cotton I had chosen - both sides of the lime green plain fabric is shown here - laminated and unlaminated, the patterned fabric is shown laminated side up - shiny |
I also decided that I wanted the piping on the hood seams even though this added complexity. The other piece of laminated cotton I had bought was patterned and was the perfect match for the plain fabric. I cut strips of this patterned fabric, folded along the length of each strip and machine stitched it to make it hold the piped shape along the fold. Then I stitched each of these strips to the long central panel for the hood. The next step was to stitch the side panels to the central panel, following the shapes and ensuring that the fine piping showed evenly along each piece. This was incredibly tricky and I had several sessions of unpicking and restitching before it looked right and fitted the frame properly. I was too absorbed in stitching and testing the shape to remember to take photos of each stage.
 |
| The stained and damaged old hood and near perfect lining on top of the new fabric |
I made the mistake of not clamping the fabric onto the hood frame and leaving it on for a few days to stretch to shape. I have subsequently received this advice from Catherine who stretched hers for 2 weeks. I did a partial stretch as there was a gap of a couple of days between restitching at one point and I did notice that this helped but didn't think to use some clamps or clips (which is what would have been done in the factory). So I moved straight onto the process of stitching the new hood onto the frame. I think I did this 3 times before I was reasonably happy with it and at one point restitched along a length of the piped seams because my over generous seam allowance at the top of the hood was leaving too much slack of fabric which was refusing to stretch taut enough, resulting in unsightly bulges and sags (they were slight but enough to annoy me).
 |
| The hood fabric stitched onto the frame, looking at the inside (shiny lamination) |
Partly as a result of not clamping, it was complicated sewing the fabric onto the frame - I did short lengths at a time with new threads so that if I had to unpick a section I wasn't unpicking the whole thing. The first time I stitched it on I made the stitches on the inside too short which meant lots of fine stitches showing on the outside which tended to pucker the fabric so the whole lot came off and I started again. The side brackets were needed to create the tension but at the same time I couldn't put the bracket bolt holes in the fabric too early in case I got them in the wrong places. But I gradually worked out the best order of sewing to get tensions right and the whole thing fitting in the right place then I was able to insert the side brackets. As explained earlier, in the factory the hood, tape and lining were all sewn onto the frame in one go because they had clamps for holding the fabric in place, I decided that because I had remade the pattern and was fitting it by trial and error it was better to do one at a time. I still have a bit of puckering along one seam so may yet unpick that side of the hood and restitch with longer stitches on the inside now that the fabric has had more days of stretching.
 |
| The hood fabric stitched onto the frame, showing the stitching to hold the wires in place |
 |
| The outside of the pram hood before the lining was fitted with the stitch puckering which is still bothering me |
 |
| The outside of the pram hood showing the piping in the patterned laminated fabric |
Once the outer fabric fitted the frame I cut out a replacement for the stained tape which framed the inside of the hood (shading for the baby's eyes or just decorative?). This had to be gathered tightly at the top curves of the front of the hood. The original was made of woven tape so it had sealed edges, because I was using fabric which I had cut, it made sense to double it over, so the gather had to be along the central length (on the fold) rather than along the edge of the fabric. This did result in a slightly bulkier edging strip than the original, however it works.
 |
| The original tape with its gathered corners |
 |
| The patterned laminated fabric with gather stitching before I pulled up the gathers (wrong side) |
 |
| The patterned laminated fabric with gather stitching before I pulled up the gathers (right side) |
Once I had pulled up the gathers and fastened them off, I folded the strip along its length, right side out and machine stitched along the outer edge, then along the edge which now had 2 curves to hold the gathers in place and was shaped like an archway. I now had the new edging strip ready to be stitched to the inside of the hood along with the lining.
The new apron was needed, in fact I started making this before completing the hood as I wanted to see if my idea for a lined apron would work. Many photos online of Ponfa prams do not include the apron (it is an easy thing to go missing in child's play) but I was able to find enough photos to confirm the construction method. I measured the pram body and drew out a pattern on paper. The angled corners for the foot end of the pram were to help the shaping of the corners.
 |
| The pattern for the pram apron |
I cut two pieces of fabric - one of the plain and one of the patterned fabric. I stitched them together around 3 sides with the shiny side of the plain fabric facing outwards and the shiny side of the patterned fabric facing inwards so that when I turned the fabric the right side out the patterned fabric shiny side and the unlaminated side of the plain fabric faced outwards, with the seams inside. I had left the long straight edge open and had started the stitching about 15mm from the open long edge. Once it was turned the right way out I trimmed off the plain piece of fabric carefully in a straight line so that the patterned fabric could fold over the cut edge to form a patterned edging to the top of the apron. This was machine stitched close to the patterned edge so that the head end of the pram apron had a decorative trim of the patterned fabric. See diagrams below.
 |
| Pram apron order of construction - stitching the two pieces together |
 |
| Pram apron order of construction - apron turned right side out with the lining/trim fabric longer than the main fabric |
 |
| Pram apron order of construction - apron turned right side out with the lining/trim folded over and stitched to provide a contrasting trim to the main colour |
At the foot end of the apron I folded the corners and stitched across them at a diagonal to form the shaped corners for fitting snugly around the foot end of the pram. I was delighted that due to accurate stitching and careful measuring this fitted perfectly first time.
 |
| Diagram showing how to fold the fitted corners for stitching |
 |
| Stitching diagonally across the corner at the foot of the pram apron to form a neat corner |
 |
| The lined underside of the completed apron showing the fitted corners and the studs for hooking onto the metal lugs on the pram body |
The final stage of the apron construction was to fit two studs for clipping the apron to the sides of the pram body onto the tiny protruding lugs which stick out on either side of the body. I have a gadget for fitting the studs into fabric, the tricky bit was making sure each half of the stud pieces fitted into the gadget properly before clipping them onto the fabric in the right place.
 |
| The completed apron, right side up, with the patterned laminated lining providing a decorative edge |
Once I had completed the apron I returned to finish the hood. I stitched the new patterned edging strip to the original lining which I had decided to reuse. Then I stitched the lining with its new patterned trim into the inside of the hood. This included stitching the shaped part to the wire frame.
 |
| The completed hood showing the lining with patterned trim, in the folded back position |
 |
| The completed hood with lining and trim in the hood up position |
Then I fitted the hood back on the pram using the four bolt holes in the sides of the body. Last of all I fitted the new apron in place. The pram itself was now complete, only the mattress needed replacing (it was a short mattress and pillow, overstuffed) and some bedding was required.
I cut some thin wadding to shape for a new mattress (3 layers of thin wadding seemed right) and made a mattress cover of white cotton lawn. I made a top sheet with the same fabric, with a decorative edge of flowers machine stitched in lime green. I knitted a simple blanket of lime green wool in stocking stitch.
 |
| The new mattress in the pram |
 |
| The baby doll which belongs to the pram, wearing its original sleep suit (which needs some repair) on the new mattress |
 |
| The knitted blanket and decorated sheet keeping baby warm in the pram |
 |
| The pram apron back on the pram with the bedding and baby in place |
I made the decision not to repaint the black lines along the base of the sides of the pram body. This was not because I couldn't do it (fine brush, steady hand and smooth paint) but because I decided the lines wouldn't add anything to the pram with its new look hood and apron. If I had repainted the lines I might even have been tempted to do them in lime green!
 |
| The restored/refurbished Ponfa pram |
 |
| Miranda is delighted to show off the newly restored Ponfa pram |
 |
| Miranda and the newly restored Ponfa pram showing the other side |
The whole exercise of stripping down and restoring the little Ponfa pram has been absorbing and fun. I've shared the process in these five blog posts to show how we did the restoration. Other restorers may disagree with some of what we did (like the lime green!) or may argue that I shouldn't have removed or replaced the hood fabric at all and kept it original. You could say what we did to the pram was refurbishment or rejuvenation rather than restoration (pure restoration would mean restoring it to as near original as possible; with the change of hood colour and reuse of the original lining this is borderline restoration/refurbishment). However I've used the term restoration throughout as a shorthand for giving it a new lease of life as my aim was to prevent further deterioration (by removing and preventing further rust and replacing the missing apron) which will mean we can enjoy it for longer.
For the other parts in this restoration process see
Ponfa pram restoration - Part 1
Ponfa pram restoration - Part 2
Ponfa pram restoration - Part 4
The contents of this blog post has been created and shared using a Creative Commons ShareAlike Non-commercial licence which means others can remix, tweak and build upon this work non-commercially as long as they credit me and licence their new creations under the identical terms. If you reuse any part of this blog post including photos or text please use the following attribution to credit me: CC BY-NC-SA by DollMum http://dollmum.blogspot.co.uk/2015/10/ponfa-pram-restoration-part-5.html


.jpg)


