Search This Blog

Showing posts with label Sewing. Show all posts

Sunday, 30 June 2024

Sasha Festival 2024 - Dress a Sasha created by DollMum's daughter

After some thought and discussion my younger daughter decided she wanted to enter the 'English Garden Created by Adult' category for the Dress a Sasha competition at the 2024 Sasha Doll Festival, in Milton Keynes. She wanted to feature her Sasha White Dress doll Laura, who has lovely long auburn hair. She looked at paintings and pictures online to find a pre-Raphaelite painting of a girl in a garden she could recreate, and came across the 1854 painting of Fair Rosamund by Arthur Hughes. The story being depicted has a dark twist to it and for a young woman who wears Goth and steampunk influenced outfits as leisure wear, the legend of Fair Rosamund in her hidden garden appealed a lot, as did the composition of the painting. Both of us could see lots of possibilities for how to achieve that scene, we bounced ideas (it was never a competition in our home, even though I was entering exactly the same category) and she decided to treat it as a creative project which she knew would take time and effort to complete. 

The first challenge was deciding how to make the dress in the painting. We sorted through my fabric collection and found some possible candidates, but she was most concerned about how to make the bodice appear really close fitting to outline Rosamund's figure.

The bodice pattern for a Sasha dress I had made before wasn't quite fitted or long enough, so she redrew the pattern (first skill being developed) and made up the first draft using some spare old fabric from a skirt I had made years before. She wasn't satisfied with that version, so redrafted the pattern again and spent time carefully positioning and then stitching the darts using a sewing machine on both the lining (plain white fabric) and the main fabric before stitching the bodice together. She also drew the front bodice pattern for the gauze overlay fabric of the bodice, even though that part of the dress was the bit which was worrying her the most, as the fabric frays so easily.

L-R: pattern for gauze overlay front bodice, back bodice, front bodice pieces

Laura models the second prototype of the bodice

Close up of Laura modelling the second prototype of the bodice

Back view of the second prototype, pinned in place

Inside lining view of the second prototype of the bodice, showing the darts and seams

Once she was happy with the second prototype bodice, she cut the bodice pieces in the main and lining fabrics chosen.

The question about how to do the front edges on the gauze overlay part of the bodice was answered for us by advice from our local sewing shop when one of the staff suggested using the rolled edge stitch on my overlocker machine! It worked, and my daughter was so relieved as she had been trying to roll and stitch the edge by hand with no success at all because it just frayed! Once the rolled overlocking had been done, it was tricky to position the overlay pieces when stitching the bodice together, as the overlay pieces had their seams captured with the other pieces (she did not want to stitch it as a separate bodice and this was exactly the right decision). So there was a lot of precision fitting and stitching, done carefully (she was far more painstaking and patient than I would have been). The overlay fabric does not have darts in it, so was a bit oversize above the waistline, but once the fabric was captured in the side seams, the excess was trimmed and it stretched gently over the darts in the bodice.

Once the bodice was assembled, she did a double gather of the skirt piece then drew up the gather, pinned it carefully to the bodice and then hand stitched the skirt to the bodice, doing a tiny stitch around each tiny gather! I was amazed at the tireless precision. Once she was satisfied that the skirt hung right on the bodice, she stitched the lining to the skirt with tiny neat stitches (not photographed).

Stitching the skirt to the bodice with tiny stitches around each gather

Now the dress was assembled she hemmed the skirt by hand, catching the fabric on the inside by a thread each time so as to make the stitches almost invisible on the outside. Then came the creative bit she was looking forward to doing - the embroidered waistband. She put a 7mm wide dark green satin ribbon in a small embroidery hoop, selected a golden yellow coloured embroidery floss, drew out a scaled copy of the lettering from the painting of the waistband on some paper to get the size of the letters right and started embroidering the ribbon. She wasn't satisfied with anything less than perfect, unpicking stitches occasionally and showing me progress.
DollMum's daughter embroidering the waistband with Rosamund's name


The back of the dress was fastened with snap fasteners (press studs) and the waistband was carefully stitched to the dress once most of them had been stitched on, then the final pair were stitched in line with the waistband. Due to the fullness of the skirt, she decided the back of the skirt did not need to be joined as it was hidden in the display (and she was running out of time), also the fabric edges didn't need hemming because she had cut the skirt from the full width of the fabric, to get a good gather. She put the dress on Laura, fastened it at the back then rejoiced, on the Thursday morning just before the festival, in doing the final detail she had been looking forward to doing all along - the fine lacing of the overlay gauze bodice, using a single thread of cotton to lace the two sides of the bodice together from the waist up in a criss-cross pattern, stitching it while the dress was on the doll, so the tension would be right.

In the meantime, the base and backdrop was being created. Plywood boards were cut to size by our local timber merchant and my husband made up some brass brackets which were used with round head brass screws to fit the boards together. My base and backdrop was made in the same way.

My daughter printed out an enlarged version of the painting to get it to the same scale as the doll, then glued a section of the background of the painting on thick card. However, it didn't cover the whole piece of card, so she used lots of paper leaf and flower sections from the painting in a collage effect to cover the remaining card (back and sides). This collage work took several hours to complete - once again she was meticulous in trying to get it as close to the painting image as she could so it would look natural. The glue stick ran out so she bought a cheap alternative then discovered how rubbish that was, so I got the proper stuff in a quick trip to a local shop.

She painted the base board thick card with acrylic paints, mixing the colours to get the mottled path right, and painted on some fallen leaves, also extending the shadows from the background section of the painting, she said it was good to do some artistic painting again, the last time she did was about 5 years ago for GCSE art.

The Dress a Sasha rules requested entrants use as much in the way of recycled materials as possible, however she purchased some strands of small scale imitation ivy and some plastic flowers from a local shop, as making these would not have been feasible in the time available. We found some blocks of green oasis left over from a craft workshop I had run 6 years ago and she cut out some of the foreground plants and flowers from the enlarged print of the painting, then cut around them to get the shapes right. These were pinned or pushed into the oasis blocks, then arranged on the base board to build up the foreground planting. 

It seemed to make sense to display the description card with a picture of the painting on a miniature easel, as the original was a painting. The description card was glued onto a piece of thick card. The description says:

Fair Rosamund by Arthur Hughes (1854)

Legend tells how Rosamund Clifford was given a hidden garden beyond a maze at Woodstock Palace, Oxfordshire by King Henry II but his jealous wife Eleanor of Aquitaine discovered the entrance and poisoned Fair Rosamund. The iris and foxglove flowers in this painting of her garden predict her death by poison, with the Queen in the background. Historical accounts indicate that when her affair with the king ended, Rosamund went to Godstow Abbey and died there aged 40 in 1176, so was not poisoned by the Queen. This pre-Raphaelite painting is now in Australia: https://www.ngv.vic.gov.au/explore/collection/work/4069/

Fair Rosamund 'Dress a Sasha' set up at home

Fair Rosamund in her hidden English garden

Bodice and waistband

Close up of the embroidered waistband and fine lacing on the bodice

Fair Rosamund 

The plants in the foreground of Fair Rosamund's garden

The information card about the Fair Rosamund 'Dress a Sasha' 


Fair Rosamund 'Dress a Sasha' all ready for the festival

Towards the end of making her Dress a Sasha, my daughter said she would soon need another creative project to work on, as she had enjoyed this one so much.

Sunday, 19 May 2024

Scottish outfits for Sasha Festival Children's Fund auction

Earlier this year I started thinking about what to make as my Children's Fund Auction donation for the forthcoming 2024 Sasha Doll Festival in Milton Keynes. Inspired by our 9 day Scottish roadtrip last August, which Laura and Nicolas James enjoyed, I decided to continue using the yarn I enjoy knitting (which is from the Shetland islands) and combine that with genuine Harris tweed from the outer Hebrides. In our roadtrip I had picked up a bag of tweed oddments plus some small tweed squares at a shop in Oban, none of which were big enough for making a single outfit, let alone a pair of outfits, so I started searching for Hebridean weavers online and found Shawbost Weavers who are based in the Isle of Lewis. I follow them on Facebook, they share progress of their latest weaves then post notifications when they've got the fabric ready in their online shop. 

I knew for a Sasha doll the weave pattern needed to be a small repeat rather than large checks. When they shared a post of their 'Heather' weave in early April (they posted a Scottish landscape of heather photo which had inspired the colours chosen), my colour combination appreciation was triggered and I bought half a metre of the fabric as soon as it was in their online shop (£30 for half a metre, Harris tweed fabric is not cheap in quality or price but is wonderful stuff). Fortunately the fabric, though pure wool, is not too thick for a doll, if the outfit is carefully designed. I knew lining would be necessary for the two main items, so once it arrived I searched through my fabric hoard and found some gorgeous dark purple georgette which was the leftovers from a party dress I had made for Dmd for her 13th birthday when we had attended a friend's wedding.

I used the late Ted Menten's versatile pinafore pattern for the dress (whisper - I dislike setting sleeves, so love Ted's pattern because it has none!) and found a waistcoat pattern which I redrew slightly at the shoulders to accommodate the turn right side out part of the construction, as the tweed was thick enough not turn properly with narrow shoulders (I tried a first attempt and had to cut it out again). However, before I started sewing, I knitted the 3/4 length sleeve top for the girl (Jamieson's of Shetland Spindrift Aubretia), the long sleeved shirt with collar for the boy (Jamieson's of Shetland Spindrift Natural White), the shorts for the boy (Jamieson's of Shetland Spindrift Mist) and both pairs of socks (mainly Jamieson's & Smith 2ply lace Optic White with stripes of Aubretia and Mist). I also corresponded with Lisa Hartley about leather colour for the shoes and decided on a gorgeous dark purple for both the Mary Janes with button and the Lace up shoes), after sending her a photo of the tweed. Thank you Lisa, they are perfect.

Once the outfits were coming together on the dolls, I decided they both needed headgear. The girl has a headband (lined tweed, with black elastic at the back of the neck) and the boy has a Tam O'Shanter (Scottish hat) made using a beret pattern with purple bias binding for a band. I didn't line the boy's hat as it wasn't necessary. He has a heart in the centre of the hat, symbolising friendship which is one of the themes of the festival. The pinafore dress has decorative flower buttons I had bought in a fabric shop near Boston, USA in 2022 after the Syracuse Sasha Festival, they symbolise the heather flowers which inspired the tweed colours - Heather was the name of one of my childhood friends.

The tweed fabric came with some Genuine Harris tweed labels, so I have sewn one inside the pinafore and one inside the waistcoat.

Florence and Reuben got to model the outfits and will do so at the festival but they are not part of the auction donation.

Harris Tweed and Shetland wool ensemble for Gregor and Sasha,
modelled by Reuben and Florence

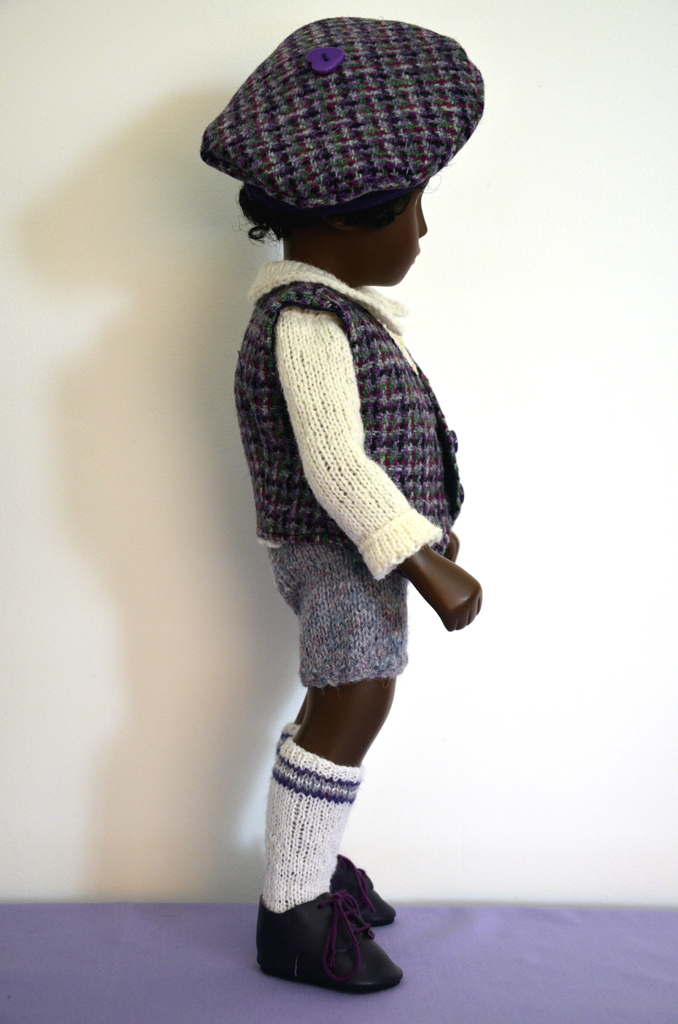
Tam O'Shanter, waistcoat, shirt and shorts for Gregor
 
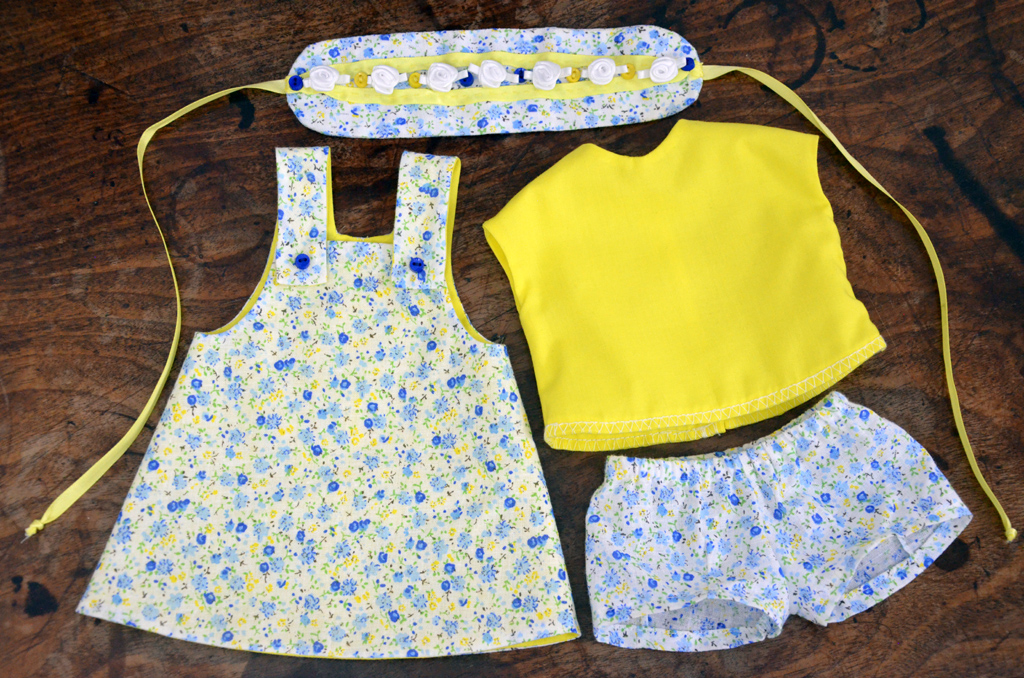
Headband, pinafore dress and 3/4 sleeve top for Sasha

Socks and Lisa Hartley lace up shoes for Gregor

Socks and Mary Jane with button fastening shoes for Sasha

Side view of the Tweed and Shetland wool outfit for Gregor

Heart button on the Tam O'Shanter

Back view of the Tweed and Shetland wool outfit for Gregor

Tam O'Shanter at a jaunty angle

Side view of the Tweed and Shetland wool outfit for Sasha showing the headband

Side view of the Tweed and Shetland wool outfit for Sasha showing the socks and shoes


Back view of the Tweed and Shetland wool outfit for Sasha

Back view of the Tweed and Shetland wool outfit for Sasha
showing the buttons and top of the pinafore

Genuine Harris tweed labels inside the pinafore dress and waistcoat

I am pleased with how I managed to achieve my vision of these outfits and hope they help raise funds 'for the children' at the 2024 Sasha Doll Festival.

Friday, 22 April 2022

Raffle prize for the Dolly Jolly

In preparation for the Dolly Jolly event which Janet has organised in May, I've been doing some sewing recently, using fabric I won on the raffle at a Sasha Celebration Weekend a few years ago: a pile of patterned fat quarters in shades of blue and yellow, plus some plain fabric. One piece of floral fabric was used to make an Easter bonnet with a matching outfit (including using the Ted Menton pinafore dress pattern), in the challenge posed by Gael S in one of the Sasha Facebook groups. I finished the bonnet and the outfit just in time for Easter day. We were in York for the whole weekend, so the photos I took of Florence with her Easter treats were in the little patio garden of the AirBnB we were staying in at the time. 

Florence models the Easter bonnet picnic outfit on Easter Day in York

The Easter bonnet trimmed with white roses, miniature buttons and ribbon

The Easter bonnet fabric is a delicate floral pattern in blues and yellows with a touch of green

The Easter bonnet tied under her chin with yellow ribbon


The Easter bonnet / picnic outfit includes a sleeveless shirt, knickers, Ted Menton pinafore dress and the Easter bonnet

The other part of the sewing I hadn't quite finished before we drove to York on Maundy Thursday, and required my sewing machine plus the iron, so I left it at home to finish when I returned. It is a double sided Sasha doll sized picnic rug.

The Dolly Jolly picnic rug side A

The Dolly Jolly picnic rug side B

The food pattern fabric used as the centre piece on each side was quite a large piece of Mary Engelbreit fabric which I had bought a few years ago, three patterns of which I used to make a dress for my younger daughter when she was 10. It seemed right to use this fourth piece in a picnic rug. 

I had been gathering items for this raffle prize for a few weeks - two hamper baskets, the miniature tea set, the Sasha sized tumbling tower blocks and I raided our Sasha toy collection for the remaining items of fun games to play on a picnic (frisbee, bat and ball, foam football). The larger hamper basket had no lining, so I lined it with some of the food pattern fabric, the smaller basket had red and white check lining but I ripped that out and replaced it with pale blue and white check lining instead, to match the picnic rug.

The mini picnic hamper containing the tea set and mugs in their boxes

The mini picnic hamper containing the tea set (sellotape still on the tea pot lid) and mugs

The lined larger hamper basket containing the picnic games and the mini picnic hamper

Florence, her shoes and socks are NOT included in the raffle prize. 

Everything in the raffle prize fits neatly inside the larger basket. This will be a special raffle prize at the Dolly Jolly event during May 2022 (in England).

Florence wearing the Easter bonnet outfit,
with the picnic rug, tea set in its mini hamper,
picnic games and the lined hamper basket to carry the prizes.


Monday, 28 December 2020

Portable sewing kits for Christmas

In my study break since the end of September I've been in a sewing spree. Once the Advent Calendar and all its contents were complete, I made a couple of sewing accessory storage bags for my elder daughter as a Christmas gift. 

I had bought a fat quarter of Lewis & Irene fabric with dogs on it (she loves dogs) and decided that a useful gift would be a bag which she could use for storing and carrying her sewing/embroidery projects (she had started making some badges with embroidery thread on canvas). I bought a small plastic storage box for embroidery threads, an embroidery thread winder, some embroidery hoops, needles and small scissors. I designed the bag to be able to hold projects in progress on the one side (where I placed the embroidery hoops in two large pockets), then on the other side I made a deep pocket for the thread box which had shallow pockets in the dog fabric for storing things like packets of needles, a pocket for holding the thread winder, a needle case with felt flaps for the needles and a detachable case for holding the embroidery scissors. This little scissors case has felt stitched into the inside of the tip for protecting the scissor points and can clip onto a strap in the bag.

The embroidery project storage bag opened out

The embroidery project storage bag opened out, with the thread winder in its pocket

The embroidery project storage bag with the needle case flapped open

The embroidery thread storage box emerging from its pocket

The embroidery hoops emerging from the project storage pockets


The embroidery storage bag closed before the button flaps were fastened

The embroidery storage bag closed with the button flaps and snap fastenings closed

I subsequently decided that a sewing roll for holding all her accessories would be a useful gift so I found a fat quarter of sewing inspired fabric (another Lewis & Irene design), searched for as many different examples of portable fabric sewing kits as possible for design and layout inspiration then started sketching out layouts and made a list of accessories she was likely to want to store in the kit. I bought some accessories I knew she didn't already have (the steel rule, rotary cutter, scissors sharpener, tweezers, snap fasteners and also bought a packet of sewing needles though I knew she had some already.

The sewing roll opened out

The sewing roll opened out with the needle case open
and the pocket for pins or a small pin cushion

Storage pockets for a rotary cutter, 6 inch steel rule, measuring tape and tweezers

The scissors storage pocket in between thread reel storage
(my sewing scissors were inserted for the photo)

storage pockets for scissors sharpener, snap fasteners and spare needles with thread reel storage

The outer flaps folded in

The roll closed but not tied with the ribbons

The closed up sewing roll tied up

My elder daughter was very pleased with these sewing storage bags when she opened her gifts on Christmas evening after singing for 3 services in York Minster during the day. She has subsequently spent time winding embroidery threads, arranging her accessories in the pockets and putting needles in the needle cases. She also added two additional cords for thread reel storage into the sewing roll as she had several thread reels in addition to those I had provided.