This year's Sasha Celebration Weekend (SCW) was a little different from the 4 previous events (which had several different craft workshops) and the culmination of Janet's 5 years of artistic guidance and organisation of the event. Janet negotiated with the
Sasha Morgenthaler heirs for permission to use the patterns for the Sasha course dolls so the attendees of the weekend could make their very own course dolls, in the tradition adopted by Sasha in her studio (she often taught small groups of people to make dolls). It was agreed with the heirs that the dolls made would not be called Sasha dolls - they are not licenced to carry the name, so they are officially called SCW Charity Course dolls (each person making a doll paid for the materials and a donation to a children's charity).
Each person making a complete 20 inch course doll in the space of one weekend was never going to be possible, lots of preparation work had to be done in advance, with the added complication that some people making the dolls did not have much sewing experience beyond some basic hand sewing. Therefore Janet worked out that the doll bodies had to be machine stitched in advance by some experienced seamstresses, the plaster head moulds had to be cast and dried, then the fabric (sourced overseas) stretched over them and the faces painted. Theresa cast all 30 head moulds from a mould which had once been cast from an original Sasha clay head mould Kendal had owned. Tricia, Petrana and I sewed the body parts ready for turning and stuffing and Janet stretched the head fabric over the moulds and painted the faces. Each person making a doll was given various painting styles and eye colours to choose from so each doll face was personalised before we even arrived at the SCW on the Friday afternoon (though one was not painted as the person making the doll is an artist and wanted to paint her own doll).
All the kits were labelled and compiled by Janet and Theresa a month before and handed out in special bags provided by one of the other attendees as we arrived on Friday. We all had to buy and bring microbeads (used for filling teddy bears) for some of the filling and a large quantity of stuffing was donated by someone who wasn't able to attend.
On the Friday evening after dinner, instead of a talk or setting up displays for the next day, those of us making dolls got started on the heads while Laura got the others started on designs for their embroidery they did on Saturday which they did instead of doll making.
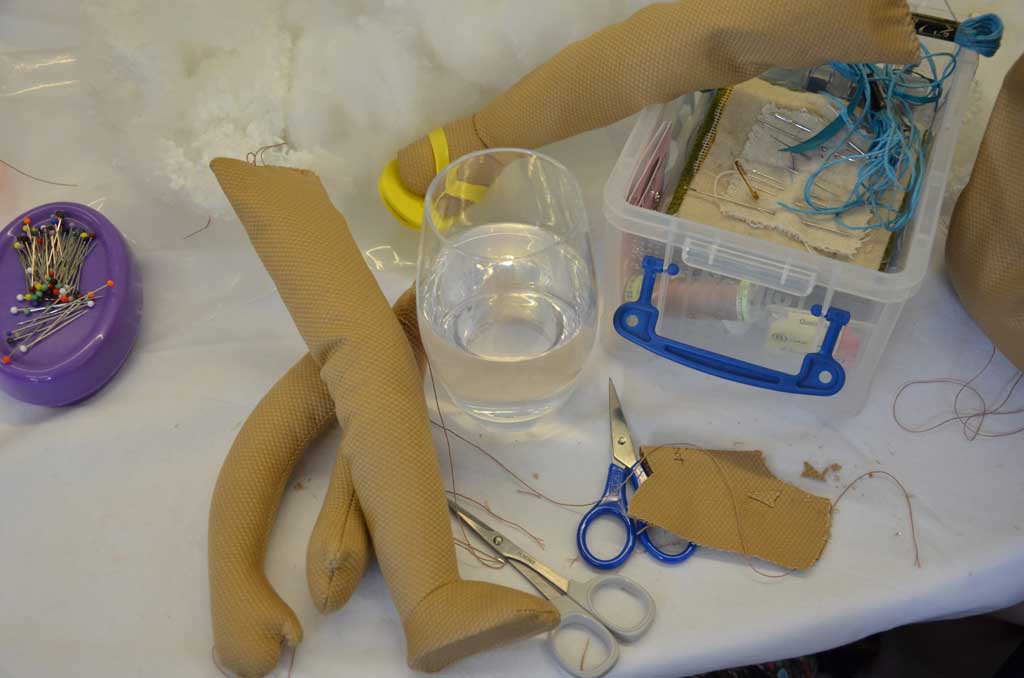
In the doll kit was a polystyrene ball which fitted inside the head mould. The fabric had to be fitted over this shape, and stitched in place, with stuffing smoothing the join between the edge of the mould and the back of the head, to complete the head shape. This was a tricky thing to do, with guidance provided by Janet and Tricia (who had made their dolls as the prototypes before the event). After making a good start, my daughter and I took our doll head back to our hotel room to finish off after 10pm. My girl and I made our doll together, she was the expert at smooth, firm stuffing, I did the hand stitching of the fabric and together we succeeded in making a reasonable head shape before we went to bed.
 |
| Tricia demonstrating how to shape and stitch the head fabric on Friday night |
 |
| Janet demonstrating her method for shaping and stitching the head fabric on Friday night |
 |
| DollMum's daughter busy inserting stuffing around the forehead rim |
 |
| Lying on her bed while continuing her magic with the head shaping |
 |
| Stuffing the head |
 |
| Finishing off the head |
 |
| The completed head stitching |
 |
| Head stitching looking like the doll had brain surgery! |
On Saturday after breakfast everyone was keen to get started on stuffing the limbs. Once again Janet and Tricia demonstrated and guided us through the process, there was plenty of chatter and singing (Nellie the Elephant!!!) during the morning as we busily got on with the task of constructing the dolls, with a stop for lunch at 1pm before fitting the heads to the bodies then stuffing the bodies.
 |
| DollMum's daughter turning an arm the right way out and pushing out the thumb |
 |
| Saturday morning doll making - all deeply engrossed in turning and stuffing limbs |
 |
| Saturday morning doll making |
 |
| Saturday morning doll making |
The legs and arms were mostly filled with microbeads followed by some stuffing before being stitched along the top to seal them. Some of us used the remainder of our microbeads in the bottom of the torsos to give some sitting weight, followed by lots of stuffing (though the shoulder plate part of the head had to be inserted into the neck hole early on and the remaining stuffing done via a hole in the side seam. Some hand stitching was done around the shoulder area to close up the neck hole, securing the head in position. Then the limbs were stitched to the torso and suddenly the dolls just needed their wigs. Most of us had made or bought wigs in advance, there wasn't time for wig making on the day. This was an exciting moment - the realisation that the doll was almost complete ready for dressing.
 |
| The underside of the head and shoulder mould with Theresa's signature and date |
 |
| Inserting the shoulder plate into the neck hole of the torso |
 |
| Limbs all stuffed awaiting the torso |
 |
| Janet and Jane W discussing doll making |
 |
| Lunchtime laughter at our table as the first doll (made by a child and her grandmother Pam) is completed and admired |
 |
| Jocelyn with her completed doll (called Renny) showing the white underwear by Jenny |
 |
| Jane S with her completed doll |
Some people had made outfits in advance, others bought outfits on the day at the sales tables after the doll making was complete.
Our doll was one of two boy dolls made (the other has long hair). Ours has a synthetic light ginger short haired wig, blue eyes, brown eye brows and freckles - he follows a tradition of making dolls dedicated to a particular person, though isn't a real life portrait doll. This is his story:
While I was growing up in Cape Town, I was known as the craft minded, doll enthusiast of the family, for this reason as a Christmas gift in 1985 I was given a doll making book by one of my two elder brothers "Dolls and how to make them" by Margaret Hutchings - he wrote a Christmas message to me in the frontispiece. I used the book as a techniques guide and inspiration rather than following any of the projects in it from start to finish, one of the techniques illustrated and described is stretching fabric over a head mould which I never tried myself. Now, a few months after my brother's death, I have made a doll dedicated to the memory of our shared childhood spent in the sunshine on the beaches and parks of Cape Town.
My brother was fair skinned with straight light ginger hair growing up in a sunny hot climate in the days before sunscreen was widely used (sadly this increased his chances of developing that melanoma). The doll needed a smooth straight haired wig so I decided a synthetic hair wig was a better option than a wool or mohair wig.
 |
| The synthetic hair light ginger wig on our boy's head just after we finished it, alongside the photo of my brother as a child at the beach |
Our boy's clothing (which I made before the SCW) is based on a photo of my younger sister, brother and I on Blouberg Beach rocks with Table Mountain in the distance across the bay. We are all barefoot in the photo, however we often wore slip slops (flip flops) on our feet during summer (4 pointed devils thorns and round burr thorns were a curse in the grass of our suburb).
I wanted our doll to have feet which could wear our childhood footwear, so Janet sent me the foot inserts in advance and I cut the big toe shape with a gap for the slip slop thong and stitched the same shape when I was sewing the feet (for this reason I had kept back one set of body parts when Theresa collected the other machined sets to take on her visit to Janet when they compiled the kits). Our two Australian Girl dolls Matilda and Belle have spare pairs of slip slops, one pair now belongs to our boy. I stitched lines to indicate his other toes and did the same for his fingers.
 |
| The foot inserts with one marked for the toe, along with the Australian Girl doll slip slops |
 |
| The toe shape cut in the foot insert |
 |
| The toe shape stitched in the foot before turning right side out |
 |
| The empty legs and feet wearing the slip slops |
 |
| The stuffed feet wearing the slip slops |
His shirt is made from one of my late father's old office shirts and the boy also has knee length denim shorts. My brother would not have worn the underwear the doll wears (except perhaps in a school play) - Jenny had made traditional combinations for every doll as a gift. Gillian crocheted multicoloured scarves for every doll too and Florence handed out little necklaces for them.
 |
| DollMum's daughter holding our newly completed SCW Charity Course doll with the photo which inspired his clothes |
 |
| Our boy (photo by DollMum's daughter using her new camera) |
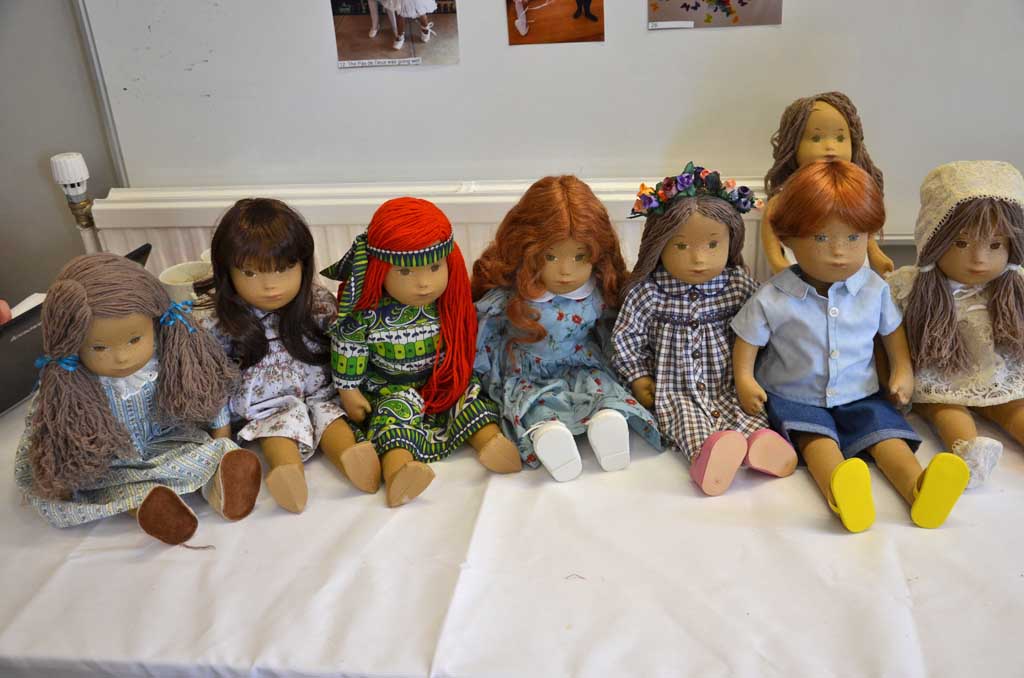
As the dolls were completed people added them to the long table below the photo competition photos. Our boy was one of the last to be completed and didn't want to push into his space (so many girls and only 2 boys)!
 |
| Our boy in his bright yellow slip slops just completed in the line up of SCW Charity course dolls |
 |
| Closer view of our boy among the girls! |
The following are my photos taken on Sunday morning before the big group photo outdoors. Each doll is unique, with different eras and designs represented in their clothing and hair styles.
 |
| SCW Charity Course Dolls 1 |
 |
| SCW Charity Course Dolls 2 |
 |
| SCW Charity Course Dolls 3 |
 |
| SCW Charity Course Dolls 4 |
 |
| SCW Charity Course Dolls 5 |
 |
| SCW Charity Course Dolls 6 |
 |
| SCW Charity Course Dolls 7 |
 |
| SCW Charity Course Dolls 8 |
 |
| SCW Charity Course Dolls 8 (including 'Teddy' the other boy - Jenny had stitched his knees so he could bend his legs more) |
 |
| SCW Charity Course Dolls 9 |
 |
| SCW Charity Course Dolls 10 |
 |
| SCW Charity Course Dolls 11 |
Photos by Alan Hinchcliffe, taken in his photo booth - it seemed appropriate that it was a beach scene backdrop.
 |
| Our boy standing up (with the help of a doll stand) at the beach (photo Alan Hinchcliffe) |
 |
| Our boy with the photo of my brother, my sister and I which inspired his clothes (photo Alan Hinchcliffe) |
The big group photo outdoors by Alan Hinchcliffe (not everyone was in it unfortunately, so a few dolls and people not included).
 |
| SCW 2019 group photo (minus a few important people and dolls) (photo Alan Hinchcliffe) |
I would like to thank Janet for negotiating and co-ordinating the creation of these SCW Charity Course dolls, Theresa, Tricia and Petrana and others for their part in the preparation work and everyone at the SCW this year for their infectious enthusiasm for this project despite the pricked fingers, difficulty getting the thumbs out and late night cranial surgery! It was a cathartic experience to create a very huggable doll with my younger daughter, in our case in memory of my brother Russell, and I am grateful that everyone at the SCW (and in the wider doll enthusiasts online group) was so supportive and understanding as we stuffed and stitched together.
I'm not sure what my brother would think of us making a doll in his memory - he would probably laugh, tease and say this was typical of me! One of my most cherished memories of our days together in November last year was of him referring to me calmly knitting socks while he dozed as comforting to him after a morning of pain and stress. So maybe he would be pleased about the doll.


.jpg)


7 comments:
Thanks so much Anna for your thorough description of the whole process of creating your doll. Having made two course dolls in Sasha's atelier in 1993, it was interesting to see how our process was the same and how it differed. Having an artist like Janet paint your faces added a nice touch to the finished product as the 12 dolls made by the six of us who took the course varied greatly in artistic value as some were artistic and others, like me, just did our best. Instead of inserting the foam ball into the heads, we stuffed the heads with newspaper and the dates on the paper now give a clue to when they were made. We also stretched the fabric over the plaster heads which were covered with glue, so there was some quality variation there too. Instead of stuffing the body parts with pellets and cotton stuffing, we used excelsior which was woody and difficult to put in smoothly. The joy of creating a course doll was the same as we had a better feeling for Sasha's creative process.
I had a wonderful time making my doll (and of course it was lovely to see you and your daughter). This post brings it all back and will keep on doing so - I look forward to the rest of them! - Jocelyn
Thank you Anna for this lovely post capturing Janet’s inspiration and pursuit of approval from the Morgenthaler family and the wonderful people that supported all the preparations for the doll making which took place in a very short period of time. We also signed up that we would not sell our dolls as Sasha dolls.
I appreciate your wonderful explanation of the process of the doll making in Nottingham this past weekend. The time went so quickly! When we arrived, we were handed a tote bag with doll parts and when we left we held our beautiful dolls in our arms. I was very struck by the dedication of each sewer and the uniqueness of each doll. Janet kindly offered 4 eye painting styles and different colors too but the doll maker added their unique touch with important wig selection and outfit choices. Your boy has such a lovely story behind his creation. I still feel like I am in a Sasha dream and don’t want to wake up! 😊 xxx
What a truly fantastically detailed account of this absolutely wonderful chance at making a similar replica of a Course Doll. An unique and 'forever-to-be-treasured' experience indeed... but unfortunately, although I was offered the chance to make one, one that was now way beyond my physical hand capabilities.
I was amazed at just how all these dolls, starting out from the same clay head mould and cloth body turned out to be so charmingly different and individual. Each and everyone becoming such superb little characters, just like Sasha's own Studio Dolls.
I loved your thoughts and reasoning for your and your daughter's SCW Charity Doll although your brother's story was so sad but as you point out we were not so aware of this sun Cancer in those days. I can well relate to having a Malignant Melanoma (although I was lucky that they were able to cut mine all out even though my doctors had missed spotting it for four years... in spite of me pointing it out on several occasions) before it had spread. I was given up to five years to live if they weren't successful and living with this thought was most certainly very stressful for all concerned.
Your usual craft work precision, neatness and perfection shows through here as always and what wonderful mother/daughter quality time must have been shared way into the night.
I and my daughter too lived in flip flops for many years and had them in a wide range of colours to match our outfits. The initial bedding in of them was rather uncomfortable especially between the big and the other toes but once over that, they were perfect for wearing on the beaches and walking by the sea and letting the air freely circulate in the hot weather. Good thinking with your adaptions for Charity Doll's feet to enable him to wear his 'slip slops.'
Many thanks for this most informative post as I know only too well just how time consuming blogging can be!
Enjoy your wonderful SCW Charity Doll in the many years to come.
I join with others here in thanking you, Anna, for your detailed explanation of the process of making a course doll. Your description and photos answered many of my questions. Thank also for explaining the special arrangements with the Morgenthalers for making the Charity dolls.
Your tribute to your brother in this post is so moving. Every detail of his appearance and outfit is special and meaningful.
It was great seeing photos of your daughter’s patient shaping of the forehead and your neat stitching. A shame to cover it up!
I love how the mould came from Kendal’s collection, was cast by Theresa, fleshed out by Janet, body and limbs sewn by you and others then given life by their creators. These dolls have passed through so many loving and expert hands.
Looking forward to more posts featuring your special Chris.
What a wonderful post, I love that you both made such a detailed amount with words and photos of your whole experience of making your doll. I really enjoyed reading how you both worked on him, sewing diligently, in your hotel room on the head, into the wee hours. I loved the whole thought process behind making your SCW doll as a tribute to your dear brother, the flip-flops and feet were truly inspired! xx
Thank you, Anna, for letting me hear all about your wonderful Sasha weekend. I loved seeing all the variations from the same starting point. Your memories of your brother and your, and your daughter's tribute to him warmed my heart. Happy to have been just a tiny bit of the story by helping with a wig.
Post a Comment